How I Deployed This Site
Published on July 19, 2026
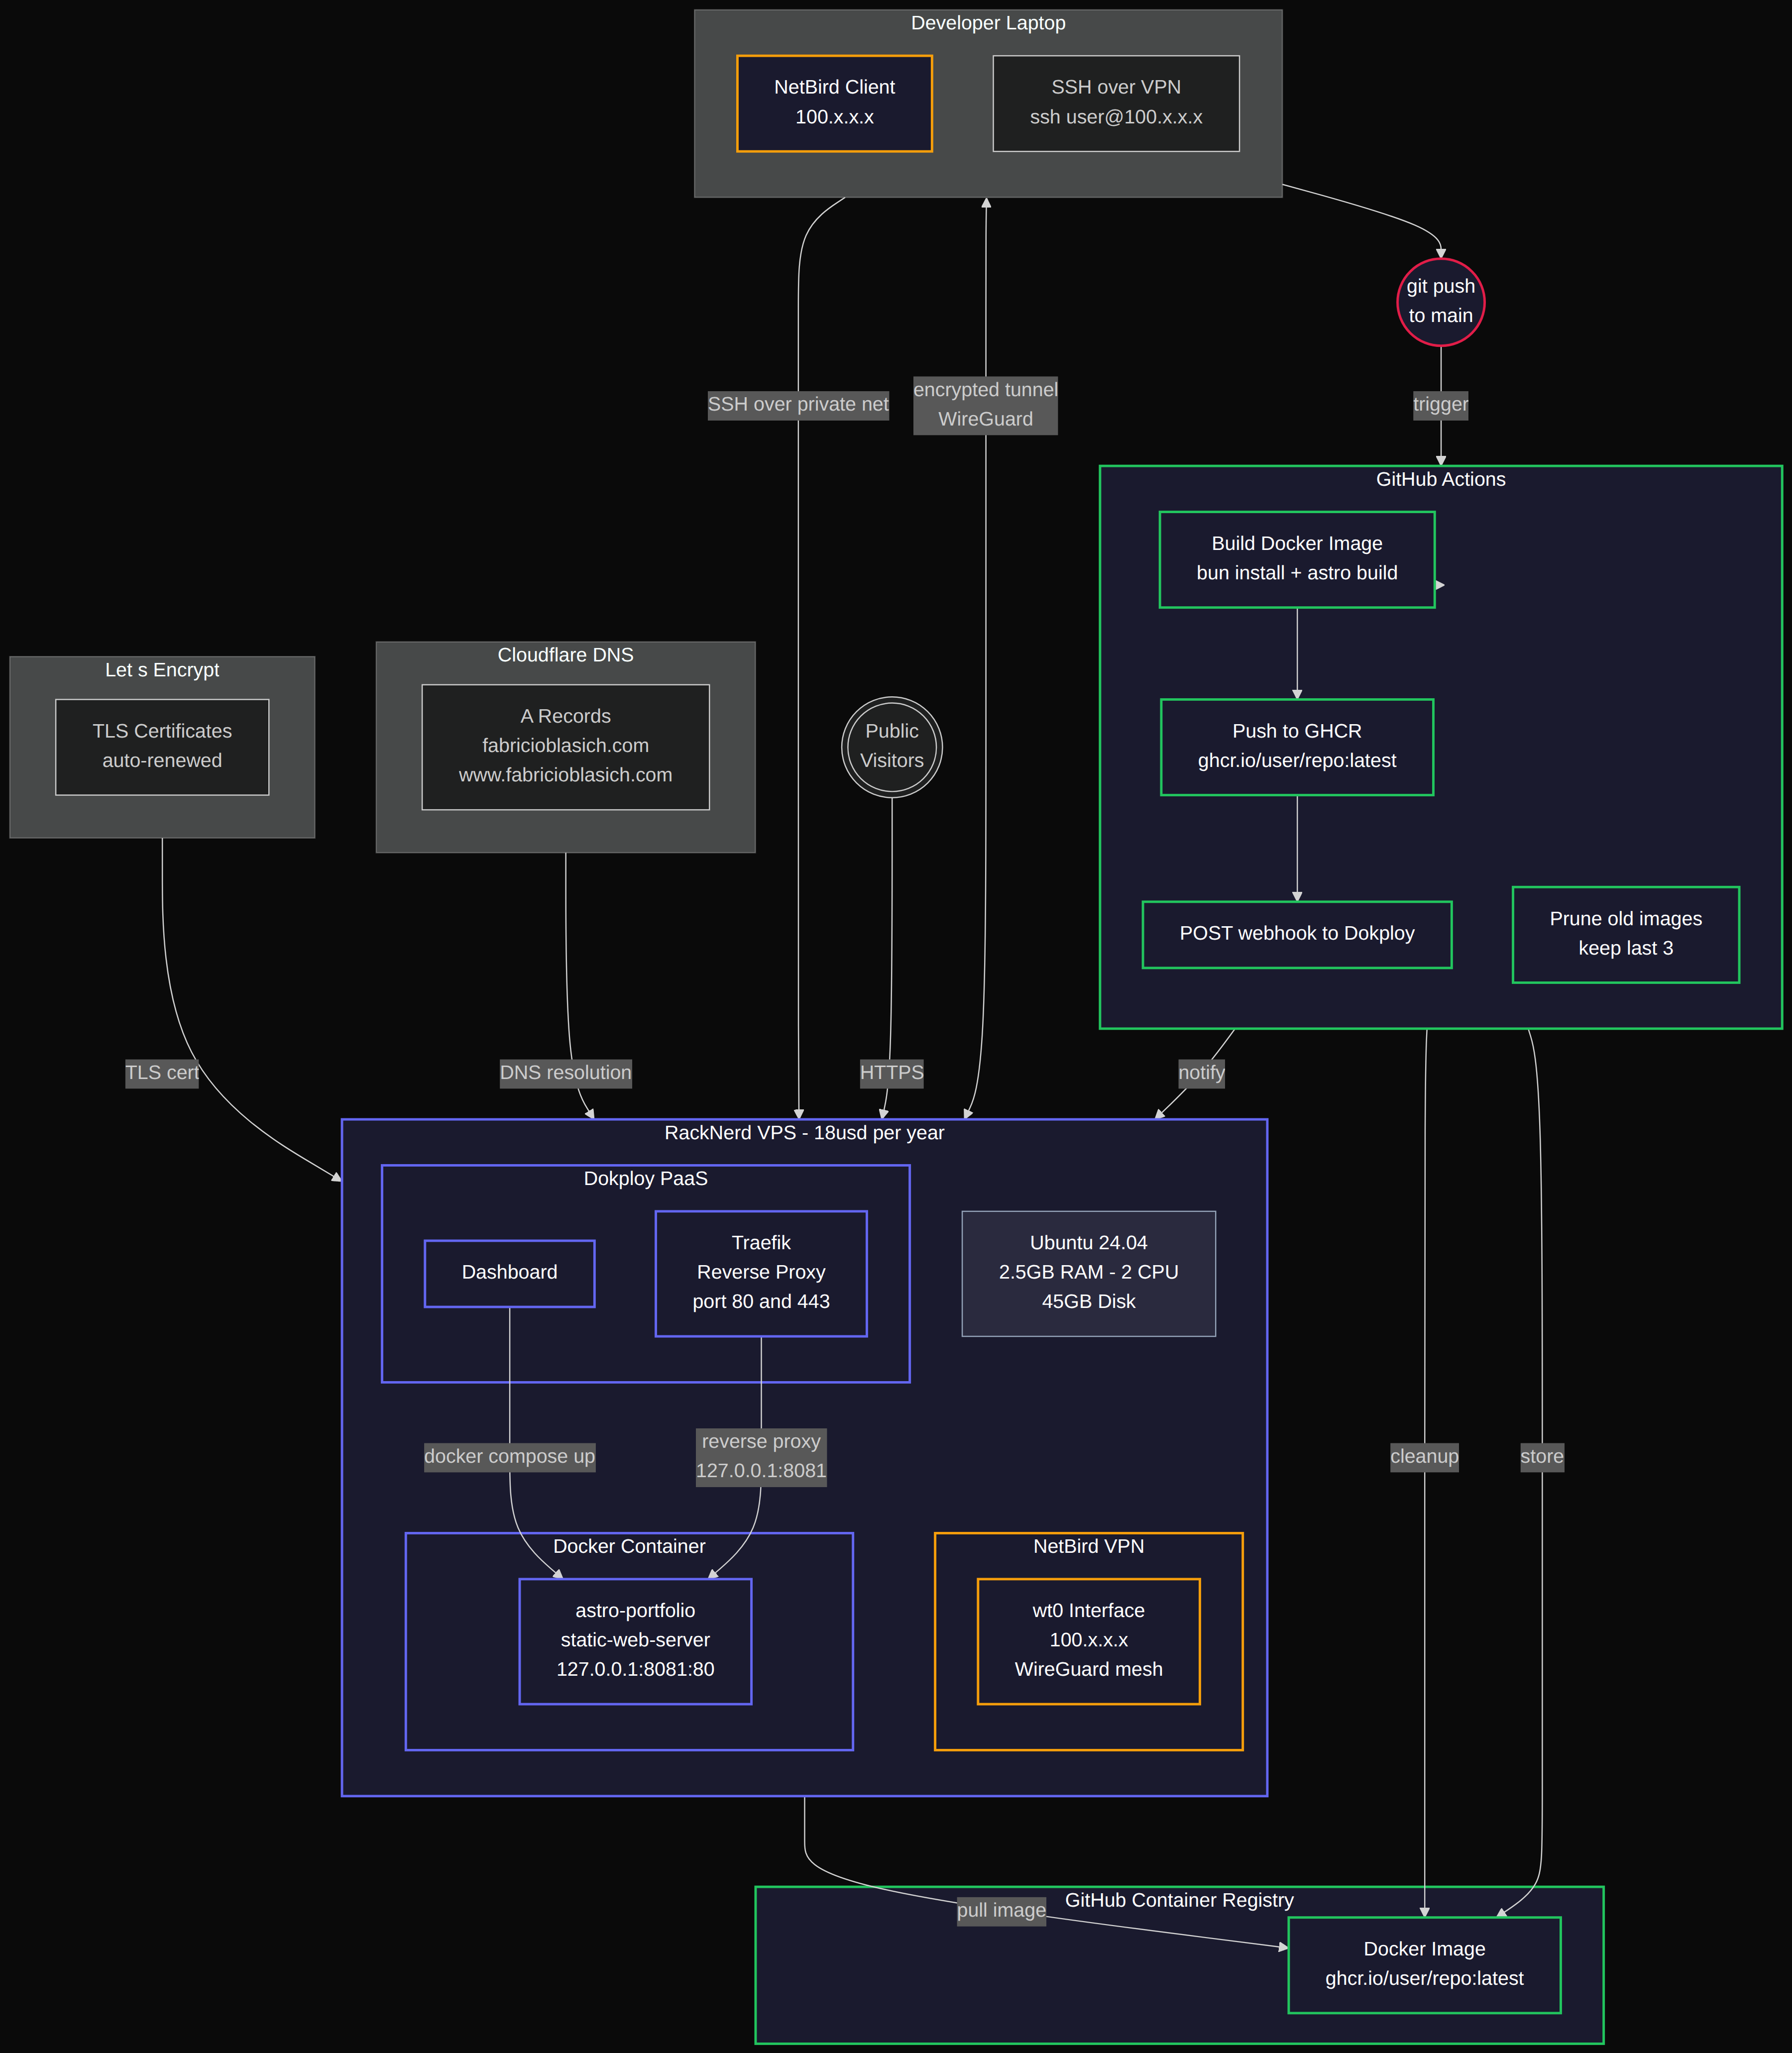
This is the exact setup I used to deploy fabricioblasich.com.
An $18/year VPS with 2.5 GB RAM
I bought a VPS on RackNerd with these specs:
- 1 IPv4 address
- 2.5 GB RAM
- 2 CPU Cores
- 45 GB disk
- 3 TB bandwidth
- Ubuntu 24.04 64-bit
- Location: New York
It cost me $18 USD for one year. I paid with Bitcoin, so no taxes were applied.
Hardening the VPS
A fresh VPS is a target. The default root password is weak, and the current user is root with full access to the system. Here is how I locked it down.
Connecting over SSH and updating packages
Your VPS provider gives you a root user, a public IP, and a password. Connect immediately:
ssh root@ipThe first thing to do is update everything. Attackers exploit known vulnerabilities in outdated packages, so keeping all packages on their latest versions closes those attack vectors before anything else touches the server:
root@ubuntu:~# apt update
root@ubuntu:~# apt upgrade
A kernel upgrade may require a reboot. Check with:
root@ubuntu:~# ls /var/run/reboot-required
  /var/run/reboot-required
If that file exists, reboot from your VPS provider dashboard.
Changing the default root password
The password your provider emailed you is compromised the moment it left their inbox. Change it:
root@ubuntu:~# passwd
root@ubuntu:~# exit
SSH back in with your new password.
Creating a non-root user with sudo access
Create a regular user with a strong password (different from the root password) and grant it sudo privileges:
root@ubuntu:~# adduser fblasichThis user cannot do anything as superuser yet. Add it to the sudo group:
root@ubuntu:~# usermod -aG sudo fblasich
root@ubuntu:~# groups fblasich
  fblasich : fblasich sudo
root@ubuntu:~# exit
Exit the root session and log in as the new user:
ssh fblasich@ipReplacing password authentication with SSH keys
Passwords can be brute-forced. SSH keys cannot. Generate a key pair on your local machine (not the VPS). GitHub has a guide on generating SSH keys.
On Linux, the public key lives at /home/YOU/.ssh/id_ALGORITHM:
cat /home/fblasich/.ssh/id_ed25519.pub
ssh-ed25519 AAAAC4NzaC1lZDI1NTE5AAAAIAuZ9+jY7MvBcehTjzc9G6bEGbME6SMi3dFJxdT7KF5F [email protected]
Copy that public key. On the VPS, create the .ssh directory with the correct permissions and an authorized_keys file, then paste it:
fblasich@ubuntu:~# mkdir -p ~/.ssh
fblasich@ubuntu:~# chmod 700 ~/.ssh
fblasich@ubuntu:~# nano ~/.ssh/authorized_keys
fblasich@ubuntu:~# chmod 600 ~/.ssh/authorized_keys
fblasich@ubuntu:~# exit
Permissions matter here. SSH refuses to use keys if the directory or file is readable by other users.
SSH back in. You will not be asked for a password. The key pair handled the negotiation.
Disabling password login
If you connect from multiple machines, set up an SSH key on each one and add every public key to authorized_keys before proceeding.
Edit the SSH daemon config:
fblasich@ubuntu:~# sudo nano /etc/ssh/sshd_configFind PasswordAuthentication yes and change it to PasswordAuthentication no. Confirm PubkeyAuthentication yes is set. Save the file.
Cloud-init may override this. Check and edit the override file too:
fblasich@ubuntu:~# sudo nano /etc/ssh/sshd_config.d/50-cloud-init.confSet PasswordAuthentication no there as well. Restart the SSH service:
fblasich@ubuntu:~# sudo service ssh restart
fblasich@ubuntu:~# exit
Test it. Try logging in as root (which has no SSH key configured):
ssh root@ip
root@ip: Permission denied (publickey).
Your regular user still works because it has a key. Everyone else gets a closed door.
If something goes wrong and your key does not work, use your VPS provider’s VNC console to log in directly and fix the key permissions (see the chmod 700 and chmod 600 steps above).
Disabling root login entirely
Even with password auth disabled, the root account is still a known target. Remove it from SSH entirely:
fblasich@ubuntu:~# sudo nano /etc/ssh/sshd_configFind # PermitRootLogin, uncomment it, and set it to PermitRootLogin no. Save and restart:
fblasich@ubuntu:~# sudo service ssh restartRoot cannot log in over SSH anymore.
Closing unused ports
Only keep the minimum ports open that your services actually use. Most VPS providers ship with ports 22 (SSH), 80 (HTTP), and 443 (HTTPS) already open in UFW. Verify with:
fblasich@ubuntu:~# sudo ufw statusYou should see those three ports allowed. If UFW is inactive, enable it:
fblasich@ubuntu:~# sudo ufw allow 22/tcp
fblasich@ubuntu:~# sudo ufw allow 80/tcp
fblasich@ubuntu:~# sudo ufw allow 443/tcp
fblasich@ubuntu:~# sudo ufw enable
Port 22 stays open for now. You will close it later, after NetBird is running and handling SSH over the private network.
Enabling automatic security updates
Manual updates get forgotten. Let the system patch itself:
fblasich@ubuntu:~# sudo apt install unattended-upgrades
fblasich@ubuntu:~# sudo dpkg-reconfigure unattended-upgrades
fblasich@ubuntu:~# sudo nano /etc/apt/apt.conf.d/50unattended-upgrades
fblasich@ubuntu:~# sudo systemctl status unattended-upgrades
By default, only security updates are enabled.

Isolating SSH behind a private VPN with NetBird
At this point the server is hardened, but port 22 is still exposed to the public internet. I wanted to close it entirely and only allow SSH through a private network.
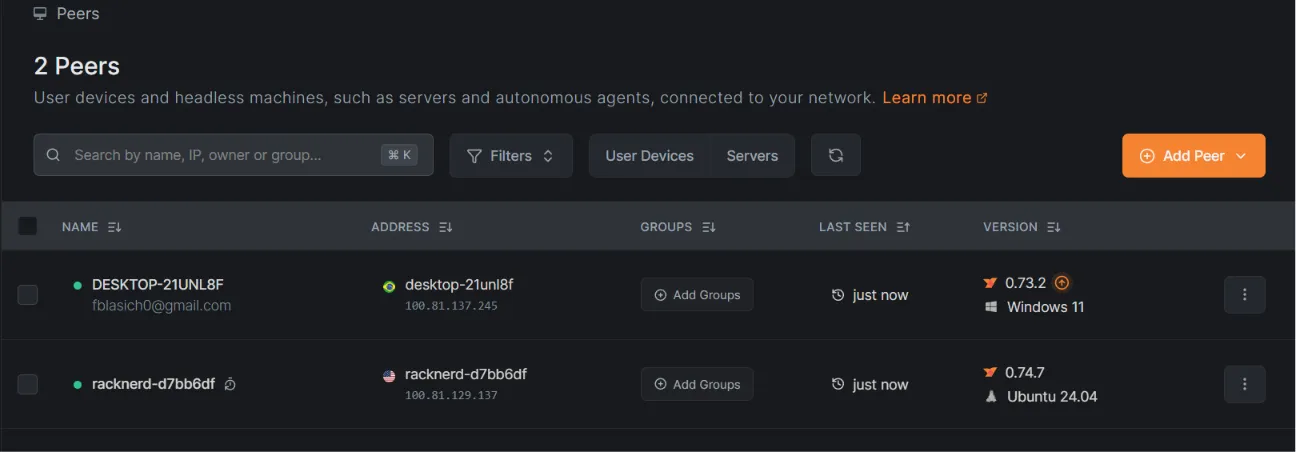
NetBird is a WireGuard-based mesh VPN. It lets you manage up to 100 peers for free. Once set up, every device on the mesh gets a private 100.x.x.x IP and can reach every other device directly.
Setting up NetBird on your laptop
Install NetBird on your local machine and log in. Then run:
netbird upAdding the VPS as a server peer
Go to the NetBird web control panel, click Add Peer, and select Server (not Device). Server peers do not expire sessions.
- Install NetBird on the VPS:
curl -fsSL https://pkgs.netbird.io/install.sh | sh-
Generate a setup key in the NetBird dashboard.
-
Run on the VPS:
netbird up --setup-key SETUP_KEYVerify the connection:
netbird statusYou can now SSH to the VPS over the private network from any device on the mesh:
ssh [email protected]Rotating setup keys
Keeping the same setup key indefinitely is a risk. Rotate it every 6 to 12 months: log out of NetBird on the VPS, connect via VNC (RackNerd provides browser-based VNC access), generate a new setup key, and re-run netbird up with the new key.
Forcing all SSH traffic through the VPN
NetBird creates the secure tunnel, but it does not manage the firewall. To force all SSH traffic through the VPN and block public access, I configured UFW manually.
Allow incoming traffic exclusively through the NetBird interface:
sudo ufw allow in on wt0Then close the public SSH port:
sudo ufw delete allow 22/tcpWhen I installed NetBird and ran netbird up, the daemon automatically orchestrated a WireGuard tunnel. It created the wt0 interface, handled the cryptography, and assigned the private IP (100.81.129.137).
The safety net: Closing the public SSH port creates a single point of failure. If NetBird crashes or an update breaks the daemon, you are locked out. I only proceeded with this strict setup because RackNerd provides out-of-band KVM/VNC access via their control panel. If NetBird ever fails, I can open the browser console from the hosting panel and fix the server locally.
Debugging DNS failures caused by NetBird
After installing NetBird, Docker containers stopped resolving domain names. This is a side effect of how NetBird manages DNS on the host.
Symptoms
bun install hung with no output during builds, both in Dokploy and in manual docker build:
docker run --rm alpine nslookup registry.npmjs.org
# connection timed out; no servers could be reached

docker run --rm oven/bun:1.3-alpine sh -c "wget ... registry.npmjs.org"
# bad address 'registry.npmjs.org'
Root cause
NetBird manages /etc/resolv.conf on the host, setting the nameserver to 100.81.82.4 (a VPN-internal IP). Docker inherits that config into containers. But containers live on Docker’s bridge network (172.17.0.x) and have no route to the NetBird network (100.81.x.x). The result is a silent DNS timeout with no error message.
The fix
Force public DNS for all containers:
echo '{"dns": ["8.8.8.8", "1.1.1.1"]}' | sudo tee /etc/docker/daemon.json
sudo systemctl restart docker
Verification
nslookup registry.npmjs.org resolved 12 IPs. bun install completed: 367 packages in 5.84s. Docker builds worked again.
Domain and HTTPS with Dokploy
Dokploy is an open-source, self-hosted PaaS that manages Docker deployments, reverse proxying, and HTTPS certificates on your own infrastructure. Think of it as a self-hosted alternative to Vercel or Railway, but you control the server, the data, and the cost. It uses Traefik under the hood for routing and Let’s Encrypt for TLS.
I bought fabricioblasich.com on Cloudflare and configured the A records:

Installing Dokploy
Install it with a single command:
curl -sSL https://dokploy.com/install.sh | shAccess the dashboard using your NetBird private IP:
http://100.x.x.x:3000This is plain HTTP, but it is safe because the traffic travels through the encrypted WireGuard tunnel. Do not expose port 3000 to the public internet.
Configuring HTTPS with Let’s Encrypt
Log in and create a strong password. Then go to Web Server Settings.
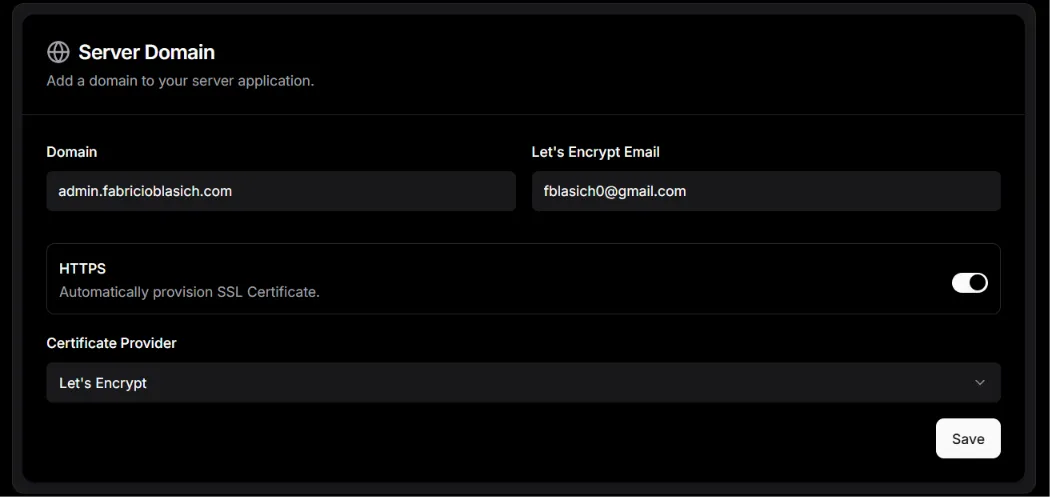
On your DNS provider, create an A record pointing admin.yourdomain to your server IP. Then in the Dokploy dashboard:
- Domain: enter
admin.yourdomain - Let’s Encrypt: enter your real email address
- HTTPS: select Let’s Encrypt as the provider
Click save. Open admin.yourdomain in a new tab. It loads over HTTPS. Log in and start deploying your projects.
Moving builds off the VPS with GitHub Actions
Dokploy can build Docker images directly from your Git repository, but on a 2.5 GB RAM VPS that is not ideal.
The fix is to build the image on GitHub’s infrastructure instead. The VPS only downloads the pre-built image and runs it.
Build on GitHub, run on your VPS
git push to main
       │
       ▼
GitHub Actions
  ├── Build Docker image
  ├── Push to ghcr.io
  ├── POST webhook → Dokploy
  └── Prune old images (keep last 3)
                        │
                        ▼
                    Dokploy
  ├── Receives webhook
  ├── Pulls image from GHCR
  └── docker compose up -d
The VPS never runs bun install or astro build. It only pulls and executes.
The GitHub Actions deploy workflow
The workflow lives at .github/workflows/pipeline.yml and triggers on pushes to main (only when relevant files change: src/, public/, Dockerfile, package.json, bun.lock, astro.config.mjs, or tsconfig.json) or manual dispatch.
name: Deploy Pipeline

on:
  push:
    branches: [main]
  workflow_dispatch:

env:
  REGISTRY: ghcr.io
  IMAGE_NAME: ${{ github.repository }}

jobs:
  build-and-push:
    runs-on: ubuntu-latest
    permissions:
      contents: read
      packages: write

    steps:
      - uses: actions/checkout@v4

      - name: Set up Docker Buildx
        uses: docker/setup-buildx-action@v3

      - name: Log in to GHCR
        uses: docker/login-action@v3
        with:
          registry: ${{ env.REGISTRY }}
          username: ${{ github.actor }}
          password: ${{ secrets.GITHUB_TOKEN }}

      - name: Extract metadata
        id: meta
        uses: docker/metadata-action@v5
        with:
          images: ${{ env.REGISTRY }}/${{ env.IMAGE_NAME }}
          tags: |
            type=raw,value=latest,enable={{ is_default_branch }}
            type=sha,format=short

      - name: Build and push
        uses: docker/build-push-action@v6
        with:
          context: .
          push: true
          tags: ${{ steps.meta.outputs.tags }}
          labels: ${{ steps.meta.outputs.labels }}
          cache-from: type=gha
          cache-to: type=gha,mode=max

      - name: Trigger Dokploy Deploy
        run: |
          curl -X POST "${{ secrets.DOKPLOY_WEBHOOK }}"

      - name: Prune old GHCR images
        uses: vlaurin/[email protected]
        with:
          token: ${{ secrets.GHCR_DELETE_TOKEN }}
          user: YOUR_GITHUB_USERNAME
          container: YOUR_REPO_NAME
          dry-run: false
          keep-last: 3
          prune-untagged: true
          prune-tags-unkept: true
Configuring Dokploy to pull from GHCR
In the Dokploy dashboard:
-
Settings > Registries: Add GHCR with your GitHub username and a Personal Access Token (PAT) with
read:packagesscope. -
Your service: Change the provider from “Git” to “Docker”. Set the image to
ghcr.io/YOUR_USERNAME/YOUR_REPO:latestand select the registry you just created. -
Copy the webhook URL from the service’s Deployments tab.
GitHub secrets
Two secrets are required in your repository’s Settings > Secrets and variables > Actions:
| Secret | Value | Purpose |
|---|---|---|
DOKPLOY_WEBHOOK | The webhook URL from Dokploy | Trigger redeploy after push |
GHCR_DELETE_TOKEN | PAT with read:packages + delete:packages | Prune old images from GHCR |
GITHUB_TOKEN is generated automatically by Actions on each run. It has packages: write permission thanks to the permissions block in the workflow. It is more secure than a PAT because it only lives for the duration of the job.
The docker-compose.yml
Dokploy uses this file to run the container:
services:
  astro-portfolio:
    image: ghcr.io/YOUR_USERNAME/YOUR_REPO:latest
    pull_policy: always
    container_name: astro-portfolio-static
    restart: unless-stopped
    ports:
      - "127.0.0.1:8081:80"
The pull_policy: always ensures Dokploy always fetches the latest image. The port binding to 127.0.0.1 means the container is only reachable from localhost. Traefik (running inside Dokploy) handles the public-facing reverse proxy.
The full flow
- You push to
main - GitHub Actions builds the Docker image on their infrastructure
- Actions pushes the image to
ghcr.io - Actions sends a POST to the Dokploy webhook
- Dokploy receives the webhook, pulls the new image, and recreates the container
- Actions prunes old GHCR images, keeping only the last 3 versions
- Your VPS never compiled anything. It just downloaded and ran.
The full pipeline config lives in this repo’s .github/workflows/. If you replicate this setup, the DNS debugging section alone will save you an afternoon.